|
 First you have to choose the machine which is going to contain the database. We suppose that the machine is called myhost. This name enables you to connect to the database from another machine. First you have to choose the machine which is going to contain the database. We suppose that the machine is called myhost. This name enables you to connect to the database from another machine.
 This machine must run with one of the system given below This machine must run with one of the system given below
PostgresQL must be installed so that the Saada user can create its own database. To get some more details on that installation please consult the following article article. To verify the efficiency of the installation you can do the following steps using the shell window.
- Database creation :
createdb TEST - Testing of the connection to the created database :
psql -h localhost - Destruction of the test database :
dropdb TEST
The application server (Tomcat release 5 and further) must be installed to enable the Saada operator to create a directory in its application area (webapps directory). To get some more details concerning the installation please consult the following article article.
To verify the efficiency of the installation you can do the following steps : (we quppose that Tomcat is installed in the directory TOMCAT_HOME)
- Directory creation TOMCAT_HOME/webapps/SAADA_TEST using the file browser or using the command
mkdir TOMCAT_HOME/webapps/SAADA_TEST - Then destruction of this directory
Now you have to create the area where the future database is going to be set up :
Choose a name for the database : MyFirstSaadaDB for example.
Create a database in Postgres from a shell window :createdb MyFirstSaadaDB
Create a directory (/home/saada/saadadbs par exemple) in which the SaadaDB stuff (not the data) will be installed. The installation takes 60Mb.
Create the repository (/home/saada/repository for example) where all files ingested in the SaadaDB will be copied. This repository must have enough space.
Creation of the relational database in PostgresQL.
This operation can be done by a shell command
- From a shell window :
createdb MyFirstSaadaDB
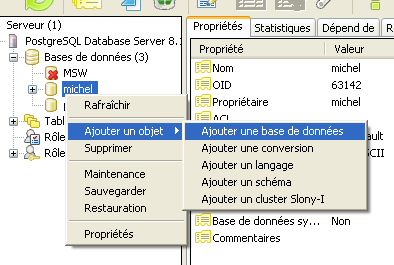
You can also create your database using the administration tool given by PostgresQL pgadmin
- Open the databases branch on the right panel.
- Right click droit on the operator name (michel in the example given below)
- Select add an object -> add a database (see the screenshot below)
 - add base step 1
- Set the database name in the field name ; Name is MyFirstSaadaDB in our example.
 - add base step 2
- The database name must appear in the thumb index properties of pgadmin.
 - add base step 3
To complete the operation you have to verify if you have access to the relational database in Postgres
- From a shell window :
psql MyFirstSaadaDB.
The screenshot below shows the answer given by Postgres when the database is properly created.
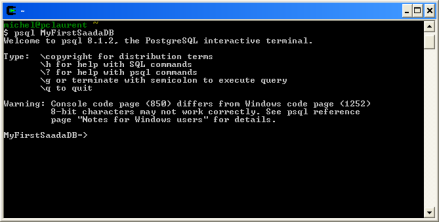 - Datanase connection test
Creation of the SaadaDB. This operation is the only one carried out by Saada.
- Go to the installation directory of Saada
- Go to the sub-directory bin
- Launch the command newBB from a shell window or from a file browser.
Then the Saada creation window appears like below
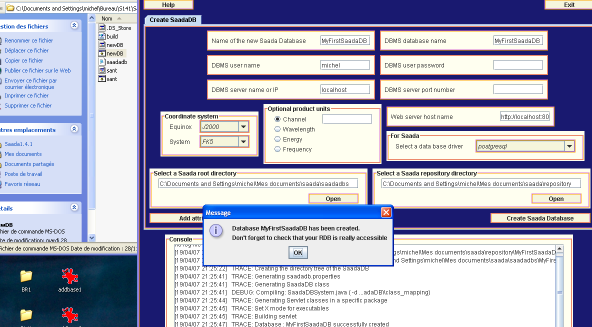 - Saadadb created
The table below clarifies the role of each field.
| Field |
Purpose |
Value in our example |
| Name of the new SaadaDB |
SaadaDB name |
MyFirstSaadaDB |
| RDBMS database name |
Name of the relationnal database.It is recommended to take the same name as for the the SaadaDB |
MyFirstSaadaDB |
| DBMS user name |
Database role name. In general it’s the name of the Saada operator (consult article |
michel |
| DBMS user password |
Password granting access to the database. At the beginning we recommend you not to use one |
|
| DBMS server name |
Name of the machine where the database server is localized. We advice you to begin with a server functioning on the localhost. |
localhost |
| DBMS serve port |
Not used in this case |
|
| Coordinate system |
Global coordinate system of the SaadaDB. The coordinates of all objects contained in the base will be converted into the system to allow gloabl requests |
FK5 J2000 |
| Spectral coordinates |
Gloabl spectral coordinates of the SaadaDB. The coordinates of all spectra contained in the base will be converted into the system to allow global requests |
not used here |
| Web server base name |
Base URL of the SaadaDB. If this field is not properly filled the l’interface graphique won’t work. |
http://myhost:8080/MyFirstSaadaDB |
| Database Driver |
take Postgres for the moment |
postgres |
| SaadaDB directory |
The installation directory of all resources necessary to the functionning of the SaadaDB |
c :\.......\saadadbs |
| Repository directory |
Repository where all ingested files will be copied |
c :\.......\repository |
| Create the SaadaDB |
Button launching the creation process of the database. This operation ends with the display of a popup window asking to verify if the relational base has been created. |
|
If you want to check if the base has been created you can list the SaadaDB directory c :\.......\saadadbs and the repository c :\.......\repository. The table below shows it.
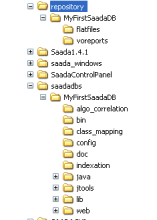 - SaadaDB Directory Tree
From now on you do not need Saada anymore. Further operation will be achieved from the base repository of the SaadaDB c :\.......\saadadbs\MyFirstSaadaDB. Designation for this repository : SAADA_DB_HOME.
Loading data files in the SaadaDB. Datafile loading operation are achieved from the SaadaDB graphical interface.
- Go to the repository SAAD_DB_HOME
- Run the application saadadbgui from a file browser or from a shell window.
 - SaadaDB GUI
Creation of a data collection Our database is quite simple and will only contain one picture. In fact you must declare at least one collection. Our collection is called FamousStars
- Open the tab collection
- Write the name of the collection : FamousStars
- Click on create
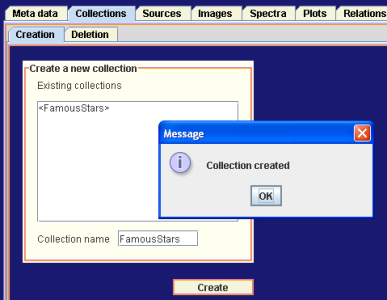 - Collection created
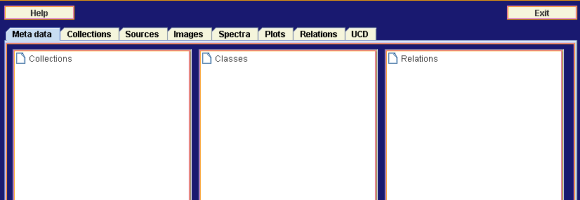
Verification procedure By opening the tab Meta data and by clicking on collections you can see that the collection has been created properly. You can see the collection FamousStars with the 5 sub-collections for each product category.
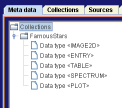 - Meta data with the collection
Create a configuration A configuration is a filter used be Saada to know how and where to store data files
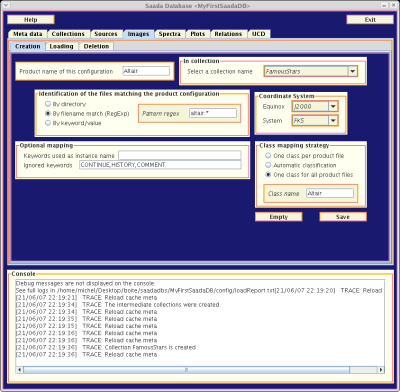 - Configuration setup
| Field |
Purpose |
Value in our example |
| Configuration name |
Used by the data loader to indetify the configurationj |
e.g. Altair |
| Collection Name |
Collection where the products matching the configuration will be stored |
FamousStars |
| Identification of the file ... |
File filter. Wetake all file with a name begining with altair |
altair.* |
| Class mapping strategy |
All product (one in fact) will be stored in one table (or class) named Altair |
Altair |
Load the image CLick on the load tab.
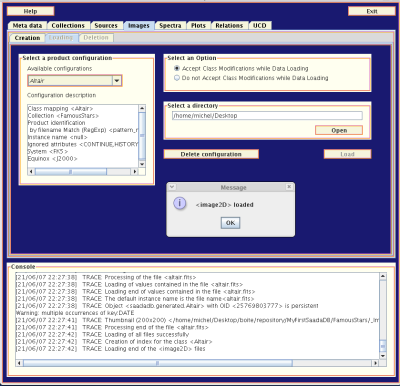 - Image Loading
- Select the configuration in the menu : Altair]
- Select the data directory
Deploy the Web Interface
Run the command SAADA_DB_HOME/bin/tomcatdeploy
Starts the Tomcat server : TOMCAT_HOME/bin/startup.sh
Connect to the URL http://localhost:8080/MyFirstSaadaDB
Click on the Database map on the top left of the window
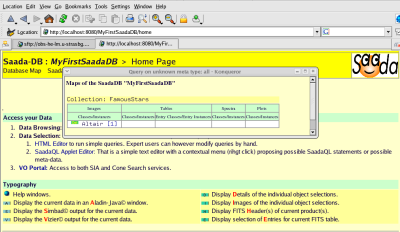 - Database Homepage
A small window is then open will all collections of your database
- Click on the number following the image class. All images of that collection then are listed.
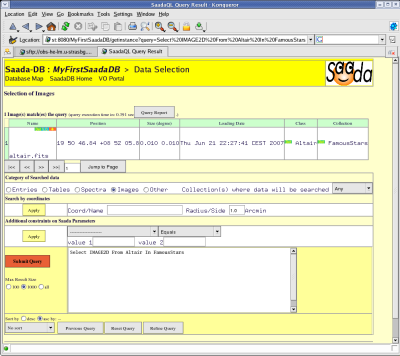 - Image Selection
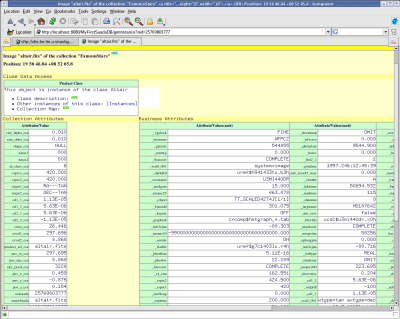
- Click on the det anchor, all keywords of the image are then displayed
 last update 2007-06-22
|